How to Convert a Hardwired Light to Plug In for Easy Use?

Time:2026-06-07 Author:Aria
0%

Converting a hardwired light fixture into a plug-in model can open up a world of versatility in your lighting options. Electrical expert John Smith, who has over 15 years of experience in home renovation, once said, "Transforming light fixtures can enhance both functionality and design." His insight highlights the practical benefits of this modification.

Whether you want to reposition your lighting or simply avoid complex wiring, understanding how to convert a hardwired light to plug-in is essential. This process not only makes your fixtures mobile but also allows for easier installation and replacement. You can easily adjust the ambiance in any room using table lamps or floor lamps instead of static hardwired fixtures.

However, it’s important to approach this project carefully. Many people underestimate the necessary safety precautions. Ensure you follow guidelines meticulously. Missing even a small detail could lead to issues like overheating or electrical fires. Each step deserves your full attention, especially if you are new to electrical work. Always prioritize safety while enjoying the creativity this project can bring.

How to Convert a Hardwired Light to Plug In for Easy Use?

How to Assess the Feasibility of Converting Hardwired Lights to Plug-Ins

Converting hardwired lights to plug-ins can provide flexibility and convenience. However, assessing feasibility is crucial before making changes. First, check local codes and regulations. Some areas may have specific rules about electrical modifications. Research shows that improper installations can lead to hazards, including electrical fires.

Consider the existing wiring. Some fixtures may not be easily modified for plug-in use. Determine if the light fixture design allows for safe conversion. The National Electrical Manufacturers Association (NEMA) highlights that using the correct components is vital to ensure safety.

Tips: Always use a qualified electrician. They can evaluate the feasibility based on your specific setup. It's also useful to evaluate whether pluggable lighting options meet your aesthetic needs. Sometimes, it's better to invest in newer fixtures designed for plug-in use. Remember, safety and compliance must be top priorities during any modifications.

Essential Tools and Materials Needed for the Conversion Process

To convert a hardwired light fixture into a plug-in version, you need specific tools and materials. Essential items include a plug-in adapter, electrical tape, and wire strippers. You’ll also need a screwdriver, a utility knife, and a junction box for the safe passage of electrical connections. A high-quality plug-in adapter ensures that the current flow remains stable, while electrical tape provides safety during the process.

When working with electrical components, safety is paramount. The National Fire Protection Association (NFPA) reports that improper installations account for significant fire hazards. Always turn off the power at the circuit breaker to minimize risks. A well-prepared workspace is essential. Arrange your tools and measure wire lengths carefully to avoid cutting errors. Relying solely on memory can lead to mistakes.

Consider these tips: double-check all connections after wiring. If possible, consult an electrician for a second opinion on your work. Using a voltage tester can help ensure you’re safe before reactivating the power. While troubleshooting, remember that electrical systems can be unpredictable. Allowing yourself time for reflection during this process often leads to better results.

Step-by-Step Guide for Disconnecting Hardwired Light Fixtures Safely

Converting a hardwired light fixture to a plug-in version can enhance convenience. Before disconnecting your fixture, ensure safety. Always turn off the power from the circuit breaker. This not only protects you but also prevents damage to the fixture.

Once the power is off, carefully remove the fixture cover. This may require a screwdriver. Disconnect the wires from the fixture, taking note of how they are connected. It's crucial to identify live, neutral, and ground wires. Using a multimeter can confirm which wire is which. Prioritize keeping track of small parts, like screws, which can easily get lost.

Tips: Gather tools in advance. A wire stripper, electrical tape, and wire nuts are essential. Double-check connections; loose wires can cause shorts. Consider labeling each wire for future reference. Ensure your new plug-in fixture complements the existing space. A mismatched style can detract from your decor.

In this process, patience is vital. Rushing can lead to mistakes. If unsure, consult a professional electrician. Safety comes first. Knowing when to seek help can save time and ensure correct installation.

Understanding Electrical Codes and Safety Regulations for Plug-In Lights

When converting hardwired lights to plug-in models, understanding electrical codes and safety regulations is crucial. Each region has specific rules governing electrical installations. These codes ensure that your new plug-in lights are safe and functional. Ignoring them may lead to hazards or fines.


Tips: Familiarize yourself with local electrical codes before starting. Check for regulations on wire colors and grounding requirements. Ensure your installation adheres to these standards.


You should always consider safety first. Use a certified electrician if unsure about the process. Improper connections can cause short circuits or fires. Verify that the plug-in cords are rated for the wattage of your lights.


Tips: Invest in quality replacement cords. Poorly made cords can compromise safety. Always follow the manufacturer's instructions when making any electrical modifications. Rushing through these steps can lead to mistakes with serious consequences.

Final Checks: Testing the Plug-In Connection for Functionality and Safety

Testing the plug-in connection is crucial after converting a hardwired light. Ensure that the switch works correctly. Begin by connecting your light fixture to a reliable power source. This process helps identify any wiring issues early.

Check for signs of overheating, such as melted connectors or discolored wires. If you notice anything unusual, consider consulting a professional. Ensure that the plug fits snugly into the outlet. A loose connection can lead to electrical hazards.

Perform a functionality test by turning the light on and off multiple times. Observe if there are any flickers or inconsistent lighting. It’s essential to evaluate how the fixture behaves under different conditions. Reflect on any potential risks during use. Always prioritize safety and reliability in your electrical projects.

FAQS

: What should I check before converting hardwired lights to plug-ins?

: Check local codes and regulations. Compliance is crucial for safety.

Can I modify any light fixture for plug-in use?

Not all fixtures are suitable. Ensure the design allows for safe conversion.

Why is the role of a qualified electrician important?

They evaluate your setup's feasibility. Their expertise helps avoid hazards.

How do I safely disconnect a hardwired light fixture?

Turn off power at the circuit breaker first. This prevents shocks and damage.

What tools do I need for this conversion?

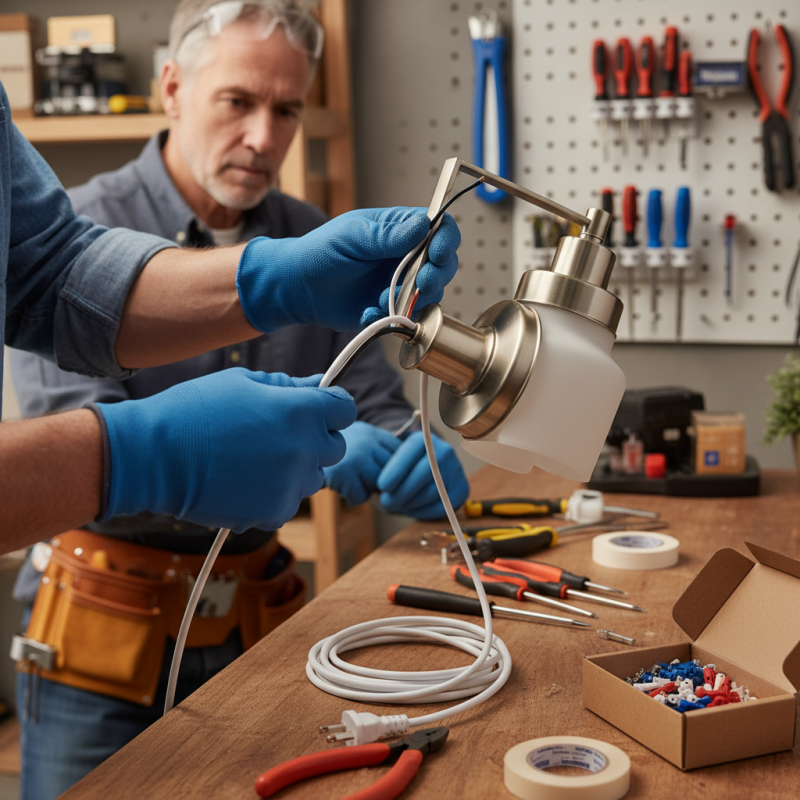
Essential tools include a wire stripper, electrical tape, and wire nuts. Gather them in advance.

What if I lose small parts during the process?

Keep track of screws and parts. Consider labeling wires for future reference.

Are electrical codes the same in every region?

No, codes vary by location. Familiarize yourself with local regulations before starting.

Is using poor-quality cords a safety risk?

Yes, poorly made cords can lead to hazards. Invest in quality replacements.

How can rushing the installation process be problematic?

Rushing increases the chance of mistakes. Take your time to ensure safety.

What should I do if I'm unsure about the installation?

Consult a professional electrician. It's better to seek help than risk errors.

Conclusion

Converting hardwired lights to plug-in fixtures can enhance flexibility and ease of use in various settings. To understand how to convert a hardwired light to plug-in, one must first assess the feasibility of this conversion by evaluating the existing electrical setup and ensuring compliance with local electrical codes. Essential tools, such as a screwdriver, wire cutters, and wire connectors, are required for the process.

The conversion involves safely disconnecting the hardwired light fixtures and following a step-by-step guide to rewire them for plug-in functionality. It’s crucial to adhere to safety regulations throughout the process and to conduct final checks to ensure the new plug-in connection operates safely and effectively. This comprehensive approach guarantees that the transition from hardwired to plug-in is successful and meets safety standards.

Aria

Aria

Aria is a dedicated marketing professional with a deep passion for innovative strategies and a keen understanding of our company's product offerings. With a wealth of experience in the industry, Aria excels at crafting engaging content that highlights the unique features and benefits of our......